Using Tailscale Custom OIDC with Authelia and Carpal
October 22, 2023 | 20 min. read
I absolutely love Tailscale as a product. It makes setting up and using a VPN totally seamless - no futzing around with OpenVPN or Wireguard configurations, it has a really nice CLI interface, and it's easy to configure settings like DNS across the entire network. It's genuinely revolutionized how I access and interact with my homelab.
Unfortunately, its user account model is kind of annoying. When I first signed up, I just logged in via my GitHub account. I didn't want (yet another) SaaS relying on my Google account, and I didn't have a Microsoft account nor AppleID at the time. This turned out to be kind of a misstep; unless you're using a custom domain or a GitHub organization, you can only have a single user in your Tailnet (see the docs. This means that I can't invite anyone else into my Tailnet, and the only workaround is using the "sharing" feature.
The sharing feature of Tailscale is a fine idea, but it's a pretty wonky workaround for this problem. Instead of inviting someone into your Tailnet and giving them access to every machine in the Tailnet (or granting more granular permissions with the super slick ACL feature), you can share each device with a user that lives outside of the network. This sucks for a few reasons:
- Instead of just sending someone a text/email containing the Tailscale invite
link, I have to sit down with them and do the IT helpdesk song and dance of
"Okay, open your browser, now type in
tailscale.com, now click "Try for free", click the Google signup button, now install the Tailscale app, ...". This is a pain in the ass for me, and feels really fiddly for anyone that just wants to play on my Minecraft server or watch movies on Jellyfin. - I have to share every device one-by-one, for each user that I'm
pseudo-inviting to my Tailnet. It's been a year or two since my algorithms
class in college, but this is an
O(n^2)Technically O(n * m), where n is the number of devices and m is the number of users, but you get the idea. ! Not good!
You can bypass the single-user restriction in a few ways. Like I mentioned earlier, you can use a custom domain and sign in with Google or Microsoft or just use a GitHub organization. Regarding Google, I mentioned previously that I don't want to have even more of my life rely on my Google account (or their products) continuing to See here for valid reasons to worry about this sort of thing. . Similarly, I didn't want to go with Microsoft and Enterprise Software Solutions™-ify all my shit. Setting up a GitHub organization solely for Tailscale usage would be the most seamless, but not everyone who uses my homelab has a GitHub account and requiring them to make one is just another annoying hoop to jump through (and another password for them to remember).
Luckily, Tailscale also supports creating Tailnets using any OpenID Connect provider - even self-hosted ones like Authelia! Tailscale also requires a WebFinger server on your domain, which is basically some software that serves arbitrary metadata for any user or resource on the domain. I'll probably leave an explanation of the inner workings of OIDC for another post, but here's a quick rundown of how signup with Tailscale will work using WebFinger and OIDC:
- You go to Tailscale's website, and enter an email address on a custom domain
you're hosting your stuff on, e.g.
user@my-domain.com - Tailscale would love to log you in, but first it needs to make sure that you
are who you say you are. To do that, it needs to know how to start the
athentication flow. It'll make a request to the WebFinger server running
under your custom domain, which the RFC expects to be at
https://my-domain.com/.well-known/webfinger. - Tailscale makes a request to your WebFinger server for the email you gave
them, like
https://my-domain.com/.well-known/webfinger?resource=acct:user@my-domain.comThe actual request query string would be URL encoded, this is just easier to read for educational purposes. . - In the WebFinger response, Tailscale will look for a
linkentry with arelproperty ofhttp://openid.net/specs/connect/1.0/issuerand anhrefpointing it to your OIDC server, e.g.https://auth.my-domain.com. - Tailscale will make a request to your OIDC server's configuration URL (which
is also expected to have the well-defined path
https://auth.my-domain.com/.well-known/openid-configuration) - In the OpenID configuration request response, it will look for an
issuerproperty and verify that it exactly matches the OIDC issuer URL from the WebFinger response. This is important! - Tailscale will then redirect you to the OIDC issuer URL, and you can authenticate using your Authelia credentials as usual.
If all of the above checks out, you'll be able to create your account and log into Tailscale using your own self-hosted OpenID Connect provider. Now, let's set up the software and go through the process ourselves.
Configuring Authelia
I'll assume that you already have Authelia installed, and you have first-factor authentication set up via LDAP or through the filesystem interface. If you haven't, I recommend lldap. It's a snap to install, and it shows exactly what to copy-paste into the Authelia configuration to get lldap and Authelia talking to each other.
The first step here is to create the client credentials. Make up an arbitrary
client ID; preferably something descriptive like tailscale or my-tailnet.
Next, we need to generate the client secret and its digest. You can do so with
the following command (if you're running Authelia natively, you can omit the
docker run authelia/authelia:latest bit):
$ docker run authelia/authelia:latest \
    authelia crypto hash generate pbkdf2 \
    --variant sha512 \
    --random \
    --random.length 72 \
    --random.charset rfc3986

Random Password: <big long string>
Digest: $pbkdf2-sha512$<another big long string>
The client secret is the Random Password part, and the digest is (as you can
probably guess) the Digest part. Save these for later!
Next, you can add Tailscale as an OIDC client to Authelia by adding the
following chunk to your configuration.yml file:
identity_providers:
  oidc:
    access_token_lifespan: 1h
    authorize_code_lifespan: 1m
    id_token_lifespan: 1h
    refresh_token_lifespan: 90m
    enable_client_debug_messages: false
    enforce_pkce: public_clients_only
    cors:
      endpoints:
        - authorization
        - token
        - revocation
        - introspection
        - userinfo
      allowed_origins:
        - "*"
    clients:
    - id: <your chosen client id> # FIXME
      description: Tailscale SSO
      secret: <the `Digest` part from earlier> # FIXME
      redirect_uris:
        - https://login.tailscale.com/a/oauth_response
      scopes:
        - openid
        - email
        - profile
Now that we have OIDC set up, we need to configure WebFinger for our domain. WebFinger essentially allows Tailscale to query any resource (i.e., user account) in the domain and ask it what URL to authenticate against. Authelia doesn't have a builtin WebFinger server, so we'll need to host our own and point it to Authelia.
Configuring Carpal
I was pretty unhappy with most of the open source WebFinger servers I could find. Most either didn't conform to spec, were extensions of existing software like Wordpress or Nginx, or had limitations like only supporting a single resource. As a result, I decided to write my own.
Carpal is an RFC-compliant webserver that allows for serving resources from a variety of backing storage methods. Currently, only the YAML file driver is written and complete. The LDAP driver is under development, and I'm also planning to implement an SQL DB driver in the future.
Carpal is super easy to set up. The docker-compose.yml file that I'm running
on my server is the just following:
version: "3"

services:
  carpal:
    image: peeley/carpal:latest
    volumes:
      - ./config:/etc/carpal/
    ports:
      - 8008:8008
And the config directory contains the following files:
# config/config.yml

driver: file
file:
  directory: /etc/carpal/resources
# config/resources/acct:noah@janissary.xyz

aliases:
  - "mailto:noah@janissary.xyz"
links:
  - rel: "http://openid.net/specs/connect/1.0/issuer"
    href: "https://auth.janissary.xyz"
Obviously, you'll want to change the email addresses and OIDC server URL to
match yours. Finally, to have https://janissary.xyz/.well-known/webfinger
point to the Docker container, I've added the following to my Nginx config:
server {
    server_name janissary.xyz;

    # redacted

    location /.well-known/webfinger {
        proxy_pass http://localhost:8008;
    }

    # redacted
}
Now, you can make a WebFinger request like this, and see the resource properly rendered as a JSON Resource Descriptor.
Now, let's create our account!
Signing Up For Tailscale
I've already signed up for Tailscale, so I unfortunately can't show the complete signup flow with my domain. However, I'll do my best, and the Authelia docs have a pretty good page (if a little out of date) on integrating with Tailscale.
First things first - visit https://login.tailscale.com/start/oidc. It should look something like this:

For the email address, type in your-username@your-domain.com. The resulting
WebFinger URL should be your-domain.com/.well-known/webfinger. Double-check
that you have a resource file in Carpal in the config/resources directory for
acct:your-username@your-domain.com, the mailto alias matches that email
addres, and there is a links entry with the href pointing to your OIDC
server. Tailscale will also expect the mailto entry of the aliases field to
match the email address you type into the signup form.
If Tailscale can contact your WebFinger server, request your email address as a resource, and find an OIDC issuer URL in the response, you should see something like the image below.
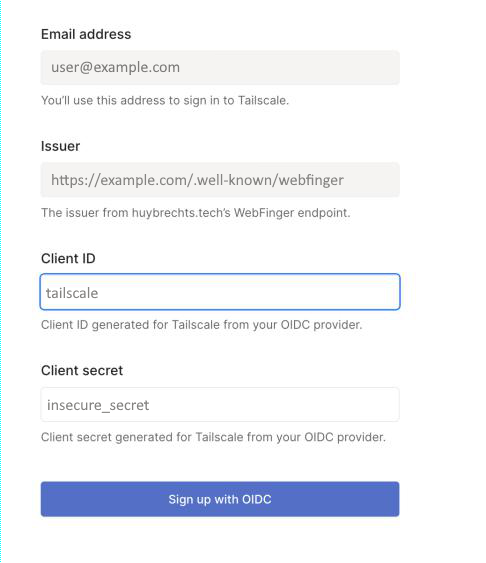
For Client ID, use the client ID you decided on earlier (like tailscale or
my-tailnet). For the Client secret, use the Random Password that you also
generated earlier with the shell command (the password itself, not the
Digest!). When I signed up, there were also a few checkboxes for different
OAuth scopes and stuff below the Client secret input field. I was able to
ignore them with no consequence, using the exact configs I've shown above. The
Tailscale
docs
have more info, in case your Authelia set up is less vanilla than mine.
After clicking the Sign up with OIDC button, you should get redirected to
your Authelia instance' login portal:
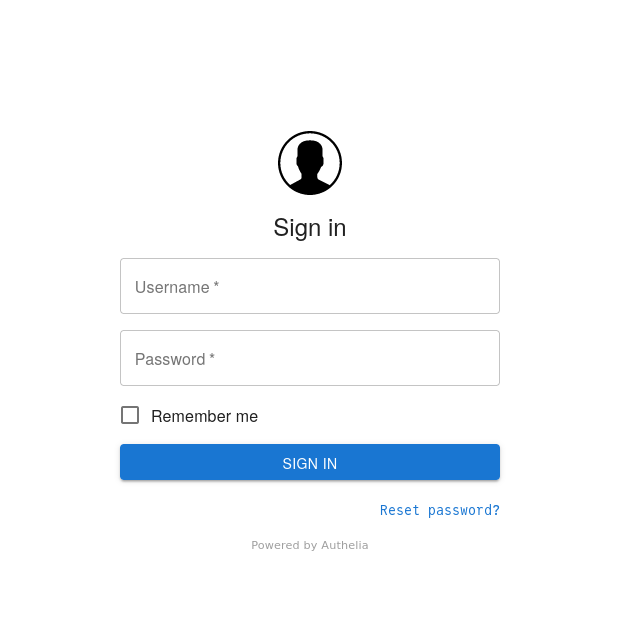
Log in with your credentials (again, I'm assuming you already have Authelia set up), and you should see the Tailscale console for your new Tailnet!
Conclusion
This was kind of a bear to set up, and migrating all of my devices over to the
new Tailnet was a little According
to the
docs,
you can contact support and migrate your old Tailnet to the new OIDC one, but I
didn't want to wait for the support ticket to get resolved or leave everything
in the hands of Customer Support (I'm sure they're wonderful, I'm just a "if you
want it done right, do it yourself" kind of guy). I ended up just manually
running sudo tailscale logout && sudo tailscale login on all the devices in my
Tailnet to migrate them. Thanks to my split-horizon DNS
setup rather than relying on the Magic DNS feature of
Tailscale, I was still able to contact all my Tailnet devices by their usual
domain names even when they were disconnected from the VPN. .
Within minutes, though, it already paid off. I was able to send an invite link
to my girlfriend, get her logged in via Authelia, and have all her devices
interconnected with my homelab in minutes. No longer will I have to email
separate links to everyone whenever I set up a new server or service in the lab.
Great success!
Also, I would feel terrible shilling my own project without extending some
support for it. If you decide to use Carpal in your own lab, first of all -
thank you, I'm honored! If you experience any issues or would like to
contribute, feel free to open an issue/PR in the GitHub
repo. I'm also open to emails, and you can
find my address in the /about page of this site.
Thanks for reading!